Last Minute Room Mom: Easy-Peasy Paper Plate Spider Web

Image

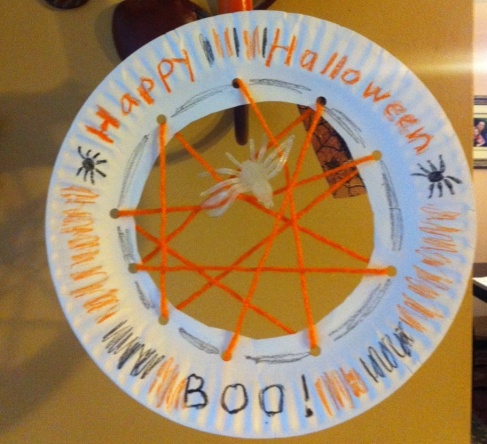
I love this quick, easy Paper Plate Spider Web craft! It is the perfect last minute craft for school parties or to do with your little loves on a rainy afternoon. Thanks to my best friend Rachel for sharing this idea with me!

The best part: you probably have all the supplies in your house. 

The entire project takes about 10 minutes to complete. For my 7-year olds class, I plan to prep the plates by cutting the center out and punching the holes. 

Supplies:

  • Paper Plates (I used white; but you could use any color or pattern)
  • Yarn in orange, black, white or green (or again, whatever you have)
  • Plastic spiders or other critters (spider rings work great too)
  • Crayons; clear tape; single hole punch

Make it:

1. Cut out the center of the paper plate. 

2. On the inside ring of the paper plate, use your hole punch to make 10 evenly spaced holes.

3. Cut a length of yarn (about 2-3 feet worth). Tape one end on back of plate by one hole, leaving 2 inches of extra yarn to tie into a loop for hanging. 

4. Wrap a small amount of tape around the other end of the yarn. This creates a makeshift “needle” that will make weaving the yarn easier.

5. Weaving the yarn threw the holes on the inside ring of the plate, making a spider web pattern. After going through the last hole, cut yarn and tape cut end to back of plate.

6. Grab your spider or other creature. Nestle/weave in yarn or wrap a piece of clear tape around the spider legs and a piece of yarn to secure it in the web.

7. Decorate outside ring of spider web with crayons.

Happy Halloween! 
Retro Crafts: Pasta Skeleton

skeletonWe spend Monday afternoons in the Children’s section of a small local library, while my oldest has tutoring.  I love paging through the old craft books–the ones that existed before Pinterest–to find fun, frugal crafts.

The moment I saw this Pasta Skeleton in a book, I knew we had to make it.  The end result is fantastic, spooky and because of Lily’s idea to paint it all with glow in the dark paint, it glows all night long.

While we figured out how to construct our skeleton, the girls got a quick lesson in a anatomy–bonus education points! I plan on packing our Skeleton (named Sally) away in our Halloween decoration bin. I love saving the best holiday pictures and crafts each year. Each year these handcrafted memories become part of our annual holiday decor.

We made our skeleton life size; but you could make any size you like. The whole project took about an hour. I let the glue dry overnight and then hung on the wall using Command Poster Strips.

The supplies are simple:

image-3

  • Black construction paper or poster board in any size you want (We made alife-size skeleton, so we used multiple sheets of 11 x 14; but you could go small or big or whatever)
  • Pasta–Various kinds (we used lasagna, bowties, mini wheels, rigatoni, ditalini, tiny little stars and linguini. But you can use whatever you have)
  • School Glue
  • Glow in the dark paint (you can find in the paint aisle at any craft store)
  • Other paint colors, if you want to add flair
  • Picture of an anatomically correct Skeleton

imageTo make the big life sized skeleton:

1. Work in sections; first begin with the head and work your way down and out. Use whatever pasta speaks to you. Long pastas like spaghetti and lasagna were great for arms and legs. Smaller tubular pastas like ziti work great for creating skulls and details at knees and elbows.

2. Refer to my pasta skeleton images and also to a photo of an anatomically correct skeleton.

3. After gluing all your pasta on the paper, lightly paint with glow-in-the-dark paint. Add any fun color details you like (we painted Sally’s bow pink; and added pink on her magic pasta wand).

4. Let dry for a few hours and hang!

Happy Halloween!

Farmer’s Market Saturday: Storing Fresh Herbs

Herbs in a vase are fragrant and fresh all week long.

I love, love, love summer Saturdays at my local Farmer’s Market. I am lucky to live within 15 minutes of a bunch of markets; but my favorite is the Blackwood Farmers Market in downtown Blackwood, NJ. It is a great little market, run by a local volunteer committee of sweet, produce-loving volunteers.

One of my favorite finds every Saturday: fresh herbs. I have a spattering of herbs in my home garden; but I certainly don’t have everything. The basil from the market is always so lush and fragrant and I simply cannot ever resist picking up a bunch.  Today I snagged  giant bouquets of basil, cilantro and dill (for pickle making tomorrow). The herbs were cheap ($2 a bunch or less), locally grown and just picked.

If you store fresh herbs the wrong way–they can go bad within a day. Basil, in particular, does not like the cold, so never, ever refrigerate it (the leaves go black quickly). And who wants black basil leaves?

Here’s my simple trick for keeping herbs fresh all week-long: treat your herbs like flowers. Grab a vase or pitcher, fill with fresh, clean cold water, a handful of ice cubes and pop your herbs in the container.

Not only is an herb bouquet gorgeous and fragrant–it lasts forever (like a week or more!). I change the water  every other day and snip bits of herbs whenever I need it.  Whatever is left when the week ends, I pop in the food processor with a little olive oil and pine nuts for a quick pesto!

Head north to Alaska: King Salmon with Lemon and Rosemary

salmon3My husband went to Alaska and left me alone with all 19 children (I really have 3. but they are loud. and messy. )

He travels on a regular basis, so I am used to flying solo for multiple days in a row. However, there was something about Alaska that made this stint as a single parent seem particularly adventurous.

It is not like PHL has hourly flights to Sitka, Alaska.

Anyway, Mike left. Caught a whole lot of fish. Then returned. And a couple days later, this arrived on my doorstep:

ImageF

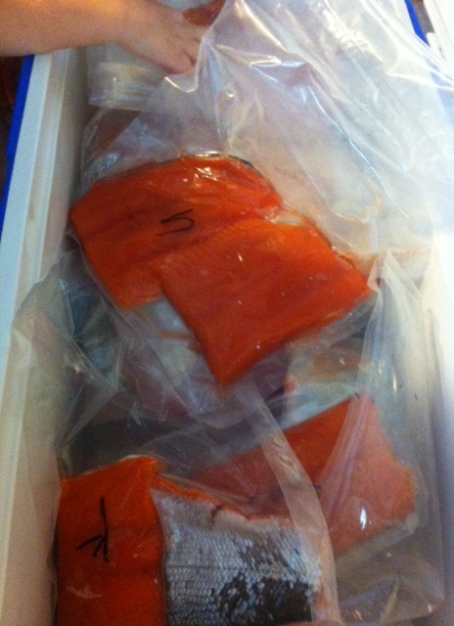
A cooler filled with 39 pounds of king salmon and halibut and rockfish (the hand belongs to one of the children. It was not shipped with the fish).

My husband can go to Alaska anytime he wants.

Typically I am a roll-up-your-sleeves-I-can-cook-anything kinda girl. But I was a little daunted by this beautiful fish. Mike and his fishing buddies caught it–what if I ceremoniously screwed it up?

We didn’t eat dinner until 8 p.m because I was staring at the fish willing it to magically explain how it would like to be cooked. After hours of googling, I settled on aEmerile Lagasse recipe for Foil Wrapped Side of Salmon with lemon, rosemary, garlic and shallots.

It was magnificent and simple.

I had to quickly scale the piece of salmon (which I did with the back side of a knife).

And then I popped into the oven for 20 minutes and out popped perfection:

salmon1

And it was so easy! (All I had to do was send my husband to Alaska! )

Here is the recipe. I think you could any type of salmon and have a fantastic and quick dinner. King salmon has a nice firm, meaty texture, different than the Atlantic farm-raised salmon that is so readily available.

And don’t be afraid of the skin–it peels off right after cooking with zero effort.

I served it with some lemon rice and the last of the spring peas.

If there were any leftovers, the salmon would be perfect on top of a spinach salad or with a little mayo on a crusty roll.

I’ve got 38.5 lbs of fish left and I really, really don’t want to share.

Coming soon: Halibut Fish Tacos, Grilled Salmon and rockfish (whatever this is. . ..) 

New Digs for Everyone’s Favorite Nana

284905_10150385753619167_1502322_nI am so excited leap back into the food and lifestyle blogging game.

I have notebooks full of great stuff to share with y’all and an itch to get cooking again. I am always up to something, so you never know what sort of shenanigans might pop up in Nana’s Fabulous Life.

This week at Nana’s Fabulous Life, I’ve got a full plate of goodness on tap, including:

+What to do with 39 pounds of salmon, halibut and rockfish

+Vintage Nana: Celebrating the 4th with Jello

+Review of Rose Romano Peppers

+Lily and Chloe Cook: The first of a series of cooking videos staring my two little trouble-makers and the world’s pickiest eaters.

So grab a gin and tonic, pick up your reading glasses and stay tuned for a fabulous ride.

PS I am still moving in and moving over the great content from my old site (nanasfablife.blogspot.com). It will all be here soon, I promise.

Herbed Quinoa Tomato Soup

It is a rainy Monday–the perfect day for a huge bowl of soup and a good book.

Lunchtime soups can be tricky–I need to turn around a midday meal fast–often in 10 minutes or less. I am not a fan of canned soup with one exception: canned tomato soup.

I’ve dabbled making homemade tomato soup and it is good–but never as good as a can of Campbell’s tomato soup.

I love to dress up canned tomato soup with simple add-ins. A sprinkle of Tabasco and some cheddar cheese is amazing; as is leftover Mexican rice. My new favorite variation: fresh herbs and quinoa.

I have a plethora of perennial herbs going strong in my garden; plus some basil and parsley in my kitchen window. Quinoa is a new favorite staple around here–yummier and more nutritious than a side of rice. 

This recipe takes less than 10 minutes, provided you have leftover quinoa in the fridge. If you don’t add about 15 minutes.

The ingredients: 
One 10 3/4 ounce can tomato soup
One cup Pre-cooked quinoa
1/4 cup chopped fresh herbs (your pick, I used a combo of oregano, basil, parsley and mint)
Tabasco sauce (a couple drops)
Good quality olive oil, just a little for a drizzle

To make:

Prepare tomato soup, according to package directions. Stir in pre-made quinoa, fresh herbs and Tabasco (or other hot sauce) to taste. Ladle into bowls and drizzle a little olive oil on top, to float.


Super Soup, Super Fast: Tortellini Soup

It has been a rainy Fall here in SNJ. And today, as the rain poured down and my sweet girls battled a cold, we had to have homemade soup.

This soup is so quick and easy. I usually keep the ingredients on hand to whip up whenever the skies pour and the coughing begins.

Ingredients:

  • 1 medium yellow onion, chopped
  • 2 tablespoons olive oil
  • Premade Tortellini (I used a bag of frozen tricolor stuffed with cheese; but you can use dried or fresh, filled with whatever you like!)
  • 4 cups chicken broth
  • 2 cups fresh baby spinach (or frozen, if you use frozen, let it thaw for 20 minutes on the counter)

Make it:
 

  1. In a dutch oven or large soup pot, warm olive oil on medium heat. Add chopped onion, stir until softened about 5 minutes.
  2. Turn heat to low, put a lid on the pot. Let the onions cook further, about 10 minutes.
  3. Add broth. Bring to a boil
  4. Add tortellini and cook according to package instructions.
  5. Chop fresh baby spinach into chunky pieces. Add about  1/4-1/2 cup to the bottom of a soup bowl. Ladle the hot soup on top. Season with salt/pepper. 

Favorite Things: Back to School Goodies

I love Back-to-School shopping. Even during the years when no one in our house was going to school, I’ve used this time of year as an excuse to shop (and buy!).

This year, Lily is starting Kindergarten–the big time. She has been in Pre-K for two years, but this year feels different.

Here are my favorite finds for back to school organization and of course, fabulous-ness (is this a word?!).  Please share your favorites in the comments section!

1. The Lunch Cube (by Klip It, available at Sur La Table)

The Lunch Cube, middle right

The Lunch Cube, retailing for just $6, is a great Bento-style lunch box solution. The top compartment is perfect for a sandwich and the bottom has two sections for sides. And the best part: it fits right inside of most lunch boxes–so your kids don’t have to sacrifice their style (Lily would die if she could not carry her Tinkerbelle lunch box to school everyday). I also grabbed the 6.7 oz size for snack time ($3) and the 11.8 oz split size (one side for yogurt and the other for granola).  It is all eco-friendly and wallet friendly.


2. FooDoodler
This might be the last year that Lily is not embarrassed by love notes in her lunch box–so I am taking advantage. The FooDoodler markers are adorable and perfect for writing on sandwiches, crackers, bagels and cookies. Plus, my kids love them. The Food Doodlers actually write like regular markers–making them fun for an afternoon food craft. I grabbed my pack at Sur la Table, but they are also available from Amazon.com. Prices vary $7-$10.

Edible love notes.

3. Cold Packs from Pottery Barn Kids
I grabbed a couple of these cold packs at the PBK store for $2 each during the Labor Day sale. They are just the right size to slip in Lily’s lunch bag and well, they are cute to look at. Bonus: the cold packs work great on bumps and bruises too.

Available at PBK

4. Retro Barrette Craft–from Disney Family Fun

Love re-living my childhood in hair!

Remember these fabulous braided barrettes? Since Lily has to wear a uniform everyday–the hair is where we have fun. This craft is super easy (and cheap–a 6 pack of barrettes was $3 and ribbon was 50-cent a spool at JoAnn fabric). We’ve already made a bunch in a rainbow of colors.

5. Little Kids Sigg Water Bottle
We are Sigg fans in our house and love the Little Kids Water bottle (we have Paddington Bear on ours). These water bottles never leak, ever. And they last forever–without getting grimy. You can find Siggs at Whole Foods or online for about $17.99 (or less).

Jersey No-Cook Pasta Sauce

All summer long, I’ve been covering the Blackwood Farmer’s Market for the Gloucester Township Patch. It has been pretty much a dream, combining two of my favorite things: food and writing. 

One of my favorite things is finding out everyone’s favorite recipes. One of the weekly vendors, Dave Monteleon Farms, is always bursting with tomatoes, fairy tale eggplant, beets, corn, peppers, peaches, basil and everything under the Jersey Summer Sun.  Doris Monteleon shared her favorite summer pasta recipe.

The recipe uses Juliet tomatoes, which sort of look like mini-plum tomatoes. You can truly use any tomato you like–I used Juliets plus a few tomatoes from our own backyard garden. To my recipe, I tossed in a few cloves of fresh garlic (Doris did not include this ingredient in her original recipe).

This sauce is bursting with garden goodness–you can taste the sunshine and the rain in every bite. It sort of makes you believe that miracles do happen–after all those tomatoes just started with a tiny seed in a green house way back in the dark days of winter.

The leftovers (if you have any) are great cold. I am eating some right now. ( :


The goodies:
1 pint Juliet tomatoes, plus 2 or 3 medium tomatoes
3 cloves garlic
handful of fresh basil
3 T. olive oil
salt/pepper
1 pound curly pasta noodle, such rigatoni or cellentani
1 ball fresh mozzarella, diced

 The work:
1. Quarter the smaller Juliet tomatoes and coarsely chop the larger tomatoes. Place in a large bowl.
2. Grate or mince garlic. Coarsely chop fresh basil. Combine garlic, basil, tomatoes, olive and salt/pepper.
3. While the tomatoes mixture is sitting, cook pasta according to package instructions.
4. Drain cooked pasta. Add mozzarella to tomato mixture.  Top the pasta with the cheese/tomato mixture. The cheese melts, the tomatoes release a little juice and the basil sings.

It is THAT good!